How to Draw Your Pet From a Photo: A Step-by-Step Guide
Draw a pet portrait that actually looks like your dog or cat. How to take the right reference photo, grid it, place the eyes, handle fur without drawing every hair, and cope with black or white coats.
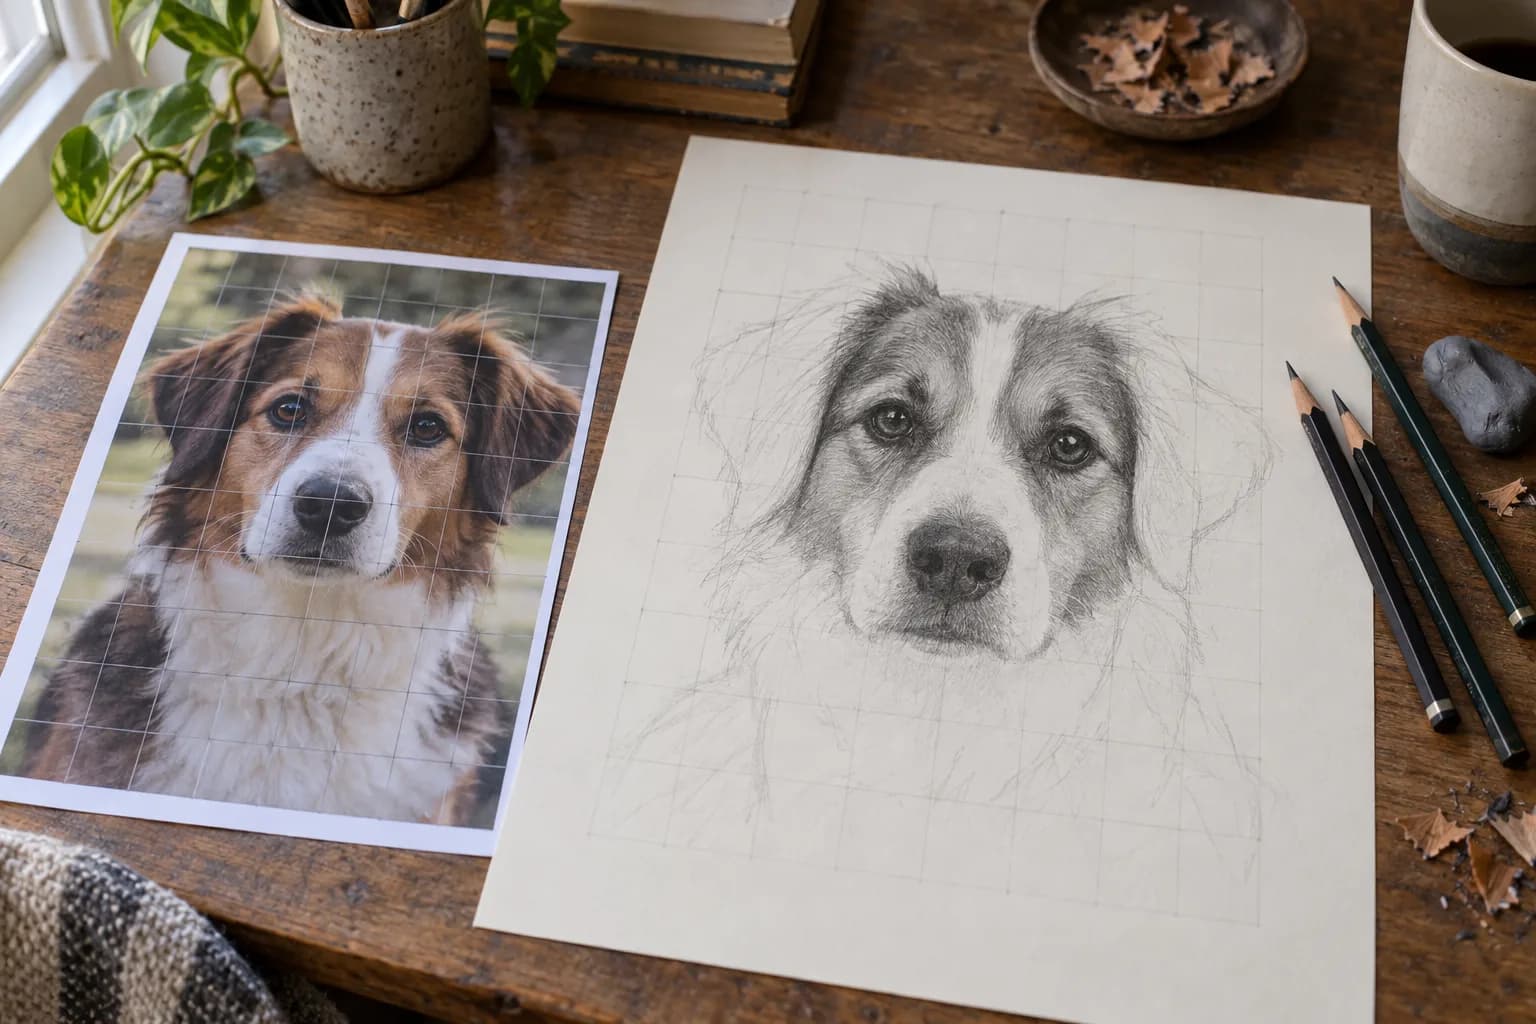
Most people don't want to draw "a dog." They want to draw their dog, the one with the crooked ear and the gray chin, and that's a much harder brief. A generic dog only has to look like a dog. Yours has to look like Biscuit, and everyone who has ever met Biscuit will notice the moment it doesn't. The good news is that likeness in animals comes down to a short list of things you can control: the photo you start from, where the eyes sit, the shape of the markings, and how you handle the fur. Here's how to get each one right, in the order you'd actually work.
Why Pet Drawings Go Wrong
When a pet drawing looks off, the fur is rarely the reason. It's almost always placement. The eyes are a couple of millimeters too far apart, the muzzle is a little too short, or the ears sit too high on the head. Animals don't give you the landmarks a human face does. There's no hairline and no clear jaw, and the whole head is covered in something that hides the bone underneath, so proportions can slide a long way before you notice.
That's exactly the problem a grid solves. Instead of judging the whole head at once, you compare small shapes one square at a time, and the eye is surprisingly good at that. Once the eyes, nose and markings are in the right squares, most of the likeness is there before you've drawn a single hair. If the grid method is new to you, the beginner's walkthrough covers the basics in about ten minutes.
Step 1: Take (or Pick) the Right Photo
Everything after this depends on the reference. A sharp, well lit photo makes an average drawing look good, and a blurry flash snapshot makes a skilled one look muddy. If your pet is around, it's worth spending twenty minutes on a new photo. These are the things that make the biggest difference:
- Get down to their level. Shoot from your pet's eye height, which usually means sitting or lying on the floor. Photos taken from standing height look down on the animal, so the head looks huge and the body shrinks away toward the floor.
- Use window light, not flash. Soft daylight from one side shows the form of the head and the direction of the fur. Flash flattens everything and makes the eyes glow green or yellow (it bounces off a reflective layer at the back of an animal's eye), and that glow is close to impossible to draw convincingly.
- Step back and zoom in. A phone held close to a dog's face exaggerates whatever is nearest the lens, which is usually the nose. Stand three to six feet away and use 2x zoom instead. The proportions come out much closer to what you see in person.
- Focus on the eyes. If only one thing in the photo is sharp, it should be the eyes. Tap on them before you shoot.
- Take a lot of pictures. Twenty shots for one keeper is normal. A treat held just above the camera helps with the eye contact.
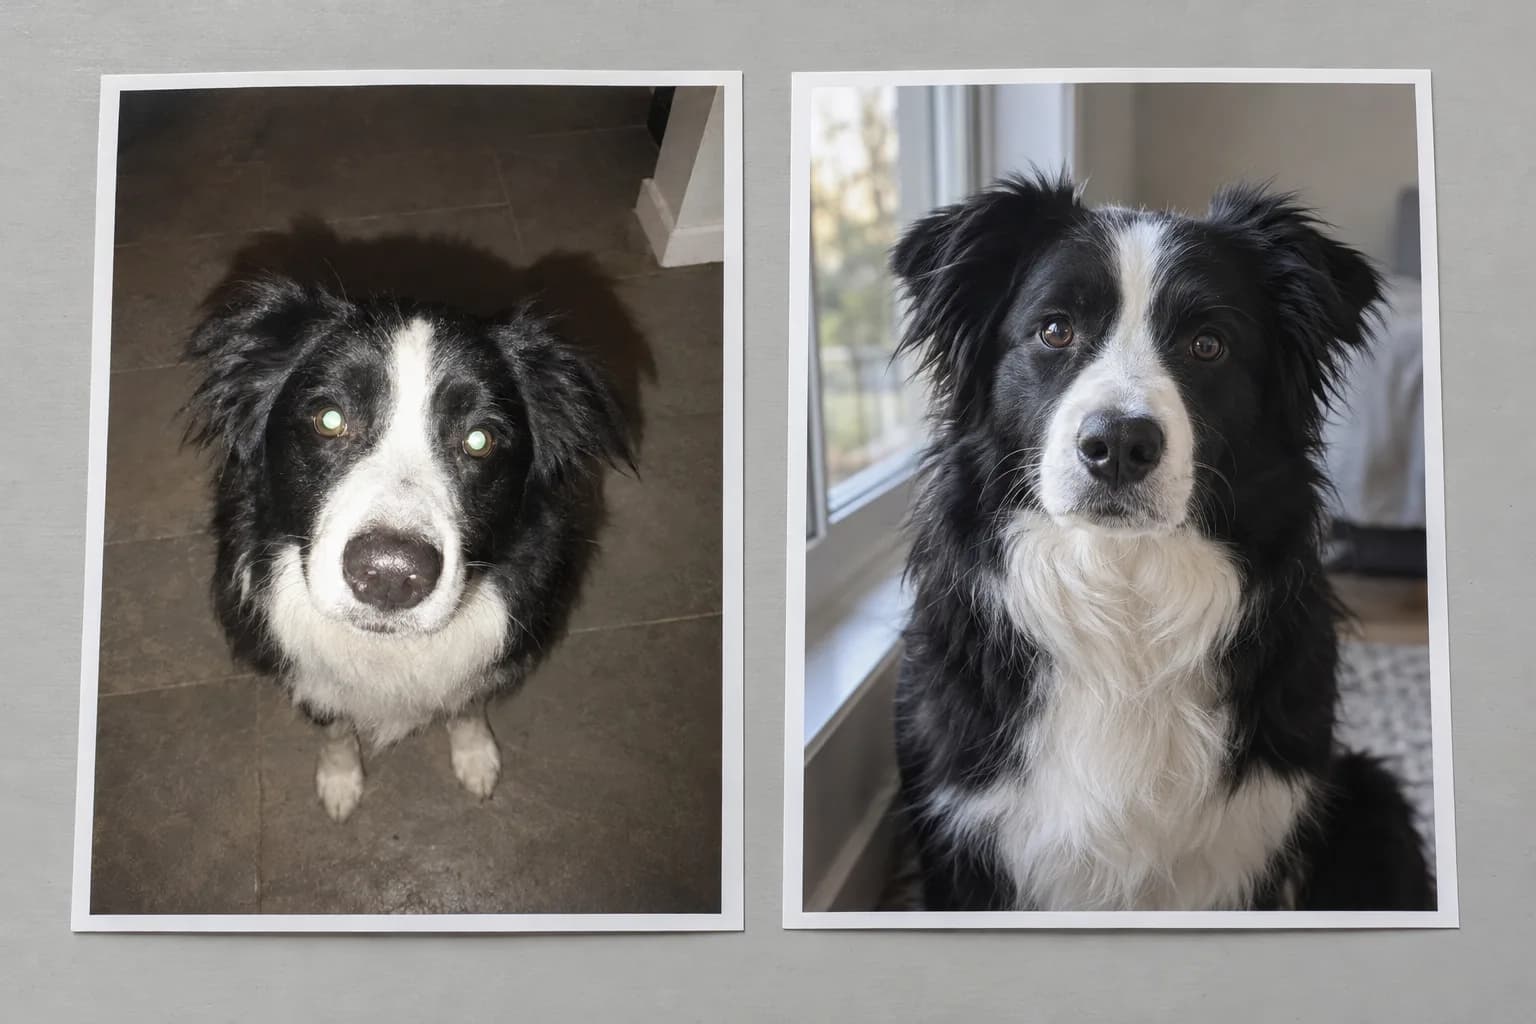
Already have a favorite photo, or drawing a pet who's no longer around? Use it. Pick the sharpest version you have, and if it's dark, brighten it before you start (more on that below). A slightly imperfect photo that captures their expression beats a technically perfect one that doesn't. When someone says a portrait "looks just like her," they're almost always reacting to the expression, not the fur.
Step 2: Crop It and Grid It
Decide what the drawing is before you grid anything. A head-and-shoulders portrait is the classic choice and the easiest to get right, because the face fills the paper and the eyes get plenty of room. Full-body poses are lovely, but they shrink the face, and the face is where the likeness lives.
Crop the photo to the same shape as your paper. This step gets skipped all the time and causes real trouble later. If you're drawing on 8x10 inch paper, your crop needs a 4:5 ratio. For A4 it's roughly 1:1.41. Get it wrong and the grid won't line up with the paper, and you'll end up squashing the ears to make everything fit. The crop tool in the Grid Maker has ratio locks for exactly this, and the aspect ratio calculator gives you the numbers for any paper size.
Then add the grid. For a head portrait, somewhere between 8 columns by 10 rows and 10 by 12 is a good range. There's a quick way to check: each eye should fill at least one whole square. If an eye sits inside a fraction of a square, add more lines, otherwise you're back to guessing where it goes. The grid density guide goes deeper if you're unsure.
Two settings are worth turning on. Cell labels give every square a name like C4, so you never lose your place. And pick a line color that contrasts with the fur: white lines vanish on a white cat, and dark lines vanish on a black Lab. Bright blue or orange works on almost anything.
On the paper, draw the matching grid very lightly with a 2H pencil, or draw on a sheet of printed grid paper and transfer the finished drawing to good paper afterwards. Either way, keep the lines faint. You'll be erasing them out of soft fur later, and hard grid lines don't come out of fur gracefully.
Step 3: Block In the Big Shapes
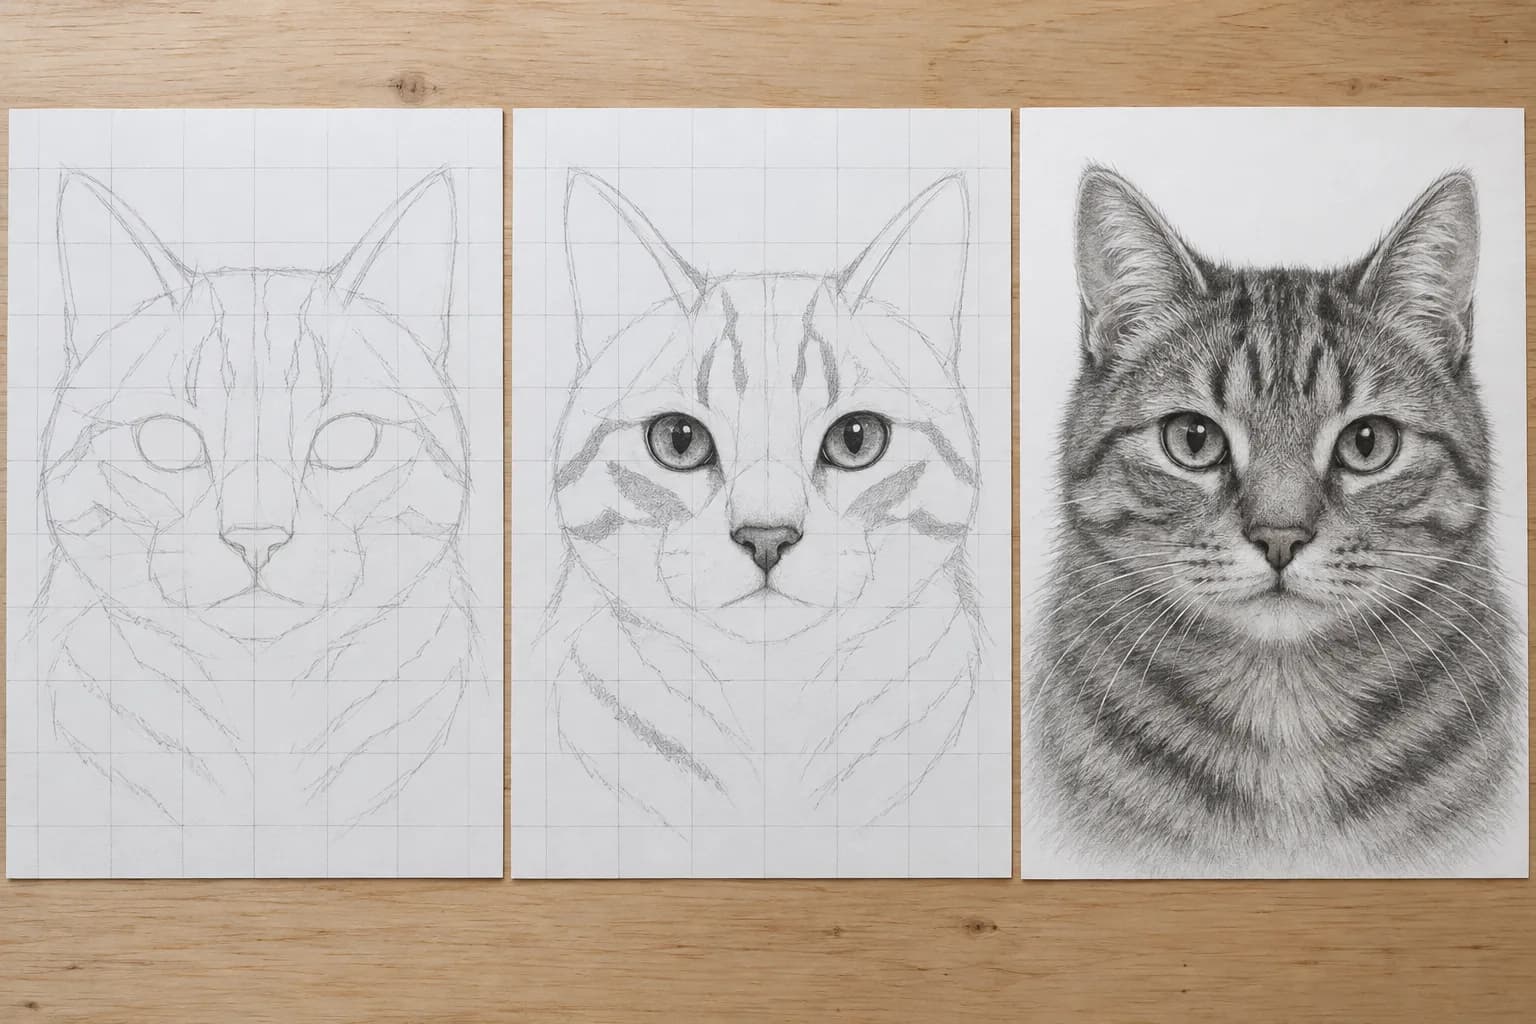
It's tempting to start with an eye. Don't, at least not yet. Start with the overall outline: the outside shape of the head, where the ears attach, the line of the muzzle and the chin. Work square by square, mark only where each line crosses the edges of the square, and keep everything light enough to erase.
Next, map the markings as flat shapes. People skip this, and it's the single most useful thing you can do for likeness. The white blaze down a collie's face, the dark mask on a shepherd, the "M" on a tabby's forehead, the patch over one eye. Those shapes are as individual as a fingerprint, and they double as landmarks. If the edge of a patch crosses the middle of square D5 in the photo, it crosses the middle of D5 on your paper. Get the markings in the right place and the eyes and nose almost place themselves.
Last, mark the eyes as simple ovals and the nose as a rough shape. Then step back, or take a photo of your drawing and look at it on your phone next to the reference. Seeing it small is the quickest way to catch a placement error, and at this stage it still only costs you an eraser.
Step 4: The Eyes
If you only get one part of the drawing really right, make it the eyes. People look there first and forgive almost anything else. A few things work differently from human eyes:
- There's very little white. Most dogs show only a sliver of white at the corners, and cats show almost none. Drawing a human almond shape with white on both sides is the fastest way to make a pet look like a cartoon, or slightly alarmed.
- The pupil changes shape. A cat's pupil is a narrow vertical slit in bright light and a big round disc in dim light. Draw what's in your photo, not what you think a cat's eye looks like. Dog pupils stay round.
- The dark rim matters. Many dogs and cats have a dark line around the eye, a bit like eyeliner. It gives the eye its shape, so look carefully at how thick it is, especially at the inner corner, where it often dips down toward the nose.
Then there's the catchlight, the small bright reflection that makes an eye look wet and alive. It's much easier to keep that spot of paper white than to add white back later, so outline the catchlight first and shade around it. Make sure it sits in the same position in both eyes, since both are reflecting the same window. If one is at one o'clock and the other is at three, your pet will look faintly cross-eyed and you won't be able to say why.
Shade the iris in layers, lighter around the pupil and darker toward the top, where the upper lid casts a shadow. That little shadow is what seats the eye inside the head instead of letting it float on the surface.
Step 5: Nose and Mouth
A dog's nose is a texture problem as much as a shape problem. The nostrils curve like commas, the top of the nose catches the light, and the surface is covered in tiny bumps you can suggest with small circles or light stippling instead of drawing each one. Leave the top lighter than you think you should. A nose shaded evenly black looks like a hole.
Cat noses are smaller and simpler: a soft, rounded triangle with a line running down from its center to the mouth, so that nose and mouth together make an upside-down Y. Draw that line too hard and it turns into a scar, so keep it soft.
For both, the mouth is usually a shadow rather than a line. Find where the lip meets the fur of the muzzle and shade the shadow underneath it, instead of outlining the lip.
Step 6: Fur Without Drawing Every Hair
This is where most people expect the hard part to be, and it's where they overwork the drawing. You don't need to draw every hair. You need to get the light and dark areas right and suggest texture in the few places where it shows.
Before you shade anything, look at the photo and work out which way the fur grows. On most dogs and cats it flows back from the nose, up over the forehead, and outward around the eyes and cheeks. Sketch a few faint arrows on the drawing if it helps. Every stroke from here on should follow them. Then build it up in layers, light to dark:
- Lay in the overall value of each area with an HB pencil, in short strokes that follow the direction of growth.
- Build the darker areas with a 2B to 4B, again following the fur. Leave small gaps between strokes. They read as lighter hairs.
- Save the darkest pencil (6B or so) for the deepest shadows: inside the ears, under the chin, and between clumps of fur.
- Lift highlights with a kneaded eraser pinched into a thin edge. A few lifted strokes across a dark area look more like shiny fur than anything you can draw on top of it.
Short coats are almost entirely about value. The texture only really shows at the edges, where fur meets background, and where the surface turns away from the light. Long coats are about clumps, not strands. Draw each lock as a shape with a light side and a dark side, and add individual hairs only at the tips.
Go easy on the blending stump. A little smoothing in the deepest shadows is fine, but blend the whole coat and it starts to look like felt.
Black Dogs, White Cats and Other Tricky Coats
Black coats
The usual problem is a photo that shows a black blob with two eyes in it. Brighten the reference before you draw. The Art Projector has a brightness control, plus a grayscale mode that makes the values easier to read, or you can push the shadows up in your phone's photo editor. Detail you couldn't see suddenly appears: the direction of the fur, the shape of the skull, the sheen along the back.
When you draw, keep that sheen. A black coat is never solid black. It reflects light, and those reflections are what make it read as fur instead of a silhouette. Save your truly darkest values for a handful of spots.
White coats
With a white animal you're drawing shadows, not fur. Most of a white cat stays bare paper, and the form comes from soft gray shadows under the chin, around the eyes, and wherever the body turns away from the light. Don't outline it. Either shade a light background behind it so the edge appears on its own, or let the edge fade out completely. A hard outline around white fur flattens it instantly.
Stripes, spots and brindle
These markings follow the form. They wrap around the head and body like lines of latitude on a globe, which makes them one of the best guides to the shape you'll ever get. Draw their curves carefully. A stripe that runs straight across a round forehead flattens the whole head.
Patches
Calico cats and patchy dogs are actually easier than solid coats, because the edges of the patches give you so many landmarks. Watch the edges themselves, though. Where two colors meet in real fur the boundary is soft and a little ragged, never a clean line.
When It Doesn't Look Like Them Yet
You've finished, it's a good drawing, and it still doesn't quite look like them. It happens to everyone. These are the usual causes, roughly in order of how often they turn up:
- The eyes are too big. We remember our pets' eyes as huge and soulful, and we draw them that way. Check them against the grid.
- The eyes are a little too close together, or too far apart. Even a small error changes the expression. Count the gap between them in squares.
- The muzzle is too short. People shorten long noses without meaning to, especially when the photo was taken from the front. Count the squares from the eyes to the tip of the nose.
- The ears are too small, or set too high.
- Everything has an outline. Real animals don't have outlines. Their edges are made of fur. Soften every edge except the eyes and nose.
- The detail is the same everywhere. When every area gets the same amount of texture, nothing stands out. Keep the sharpest detail and the strongest contrast around the eyes, and let the coat loosen up as it moves away from the face.
One trick works more often than it should: look at the drawing in a mirror, or flip a photo of it on your phone. Seeing it reversed makes your brain look at it fresh, and the error usually jumps out. The Art Projector can flip a reference with one tap if you want to compare the two the same way round.
What You Need and How Long It Takes
You don't need much:
- Pencils: a 2H for the grid, then HB, 2B, 4B and 6B. Add an 8B if you're drawing a black dog.
- Paper: smooth paper holds fine fur detail best. Smooth Bristol board or a heavy drawing paper both work well. Rough sketchbook paper fights you on every fine stroke.
- Erasers: a kneaded eraser for lifting highlights, and a pen-style eraser for cleaning grid lines out of tight spots.
- Nice to have: an embossing stylus or an empty ballpoint for whiskers (see the FAQ below), and a can of workable fixative so the finished drawing doesn't smudge.
As for time, a head-and-shoulders portrait on 8x10 paper usually takes somewhere between four and eight hours if you're fairly new to this. Split it up: the grid and block-in in one sitting, the eyes and nose in the next, the fur over one or two more. Coming back with fresh eyes is when you'll spot the things you've been staring straight past.
If It's a Gift
A hand-drawn portrait of someone's pet is one of the few presents people keep for good. If you're planning one for the holidays, a few practical things:
- Start earlier than feels necessary. Give yourself two or three weeks, so one bad evening doesn't turn into a panic.
- Do a quick practice version on cheap paper first. You'll find out where the hard parts are, and the real one will be noticeably better.
- Draw to a standard frame size. An 8x10 drawing fits a ready-made 11x14 frame with a mat, which looks far more finished than a bare sheet. Remember to crop the photo to match (Step 2).
- Getting the photo without spoiling the surprise is a small project of its own. Their social media is your friend, and so is a family member who's in on it.
- Sign it, date it, and fix it with a light coat of fixative before it goes in the frame.
If the pet has passed away, use the photo that captures them best, even if it's old or a little soft. The family will recognize the expression long before they notice the image quality.
Frequently Asked Questions
Is it cheating to use a grid for a pet portrait?
No. A grid is a measuring tool, the same way a ruler is. It tells you where things go, but it doesn't draw the eyes, the fur or the expression for you. Artists have used grids to copy and scale images for centuries, and it's a common starting point for commissioned pet portraits today.
What size grid should I use for a pet portrait?
For a head-and-shoulders portrait, start at around 8 by 10 squares and go up to 10 by 12 if the face is small in the photo. The test is simple: each eye should fill at least one whole square. Full-body poses need more squares, or a second, finer grid on a cropped copy of just the head.
How do I draw whiskers?
White whiskers over darker fur are miserable to draw around, so don't. Press them into the paper before you shade the muzzle instead. Draw each whisker firmly with an embossing stylus or an empty ballpoint to make a shallow groove. When you shade over the area later, the pencil skips the grooves and the whiskers show up as clean white lines. Dark whiskers on a light coat are easier: draw them last with a sharp pencil, one confident stroke each, starting at the muzzle and lifting off toward the tip.
My pet's photo is dark or blurry. Can I still draw from it?
Usually, yes. Brighten it first and you'll often find more detail than you expected. If the eyes are sharp, you can work out the rest. If they're blurry too, look for a second photo where the eyes are clearer and use it just for them, keeping the first photo for the pose and markings.
Should I use colored pencils instead of graphite?
Start with graphite. It's forgiving, it erases cleanly, and it lets you concentrate on shape and value, which is where likeness comes from. Colored pencil pet portraits are beautiful but much less forgiving, because the layers build up and mistakes are hard to take out. Once you have a graphite portrait you're happy with, the same process works in color with more layers.
How long does a pet portrait take?
Plan on four to eight hours for a head-and-shoulders portrait at around 8x10 inches if you're fairly new to drawing, spread across a few sessions. Long-haired breeds and full-body poses take longer.
Getting Started
Find the photo first. If you can, take a new one at your pet's eye level by a window. If not, pick the sharpest one you have. Then upload it to the Grid Maker, crop it to the shape of your paper, add a labeled grid and print it. The photo never leaves your device. If you'd like a little more structure, the Worksheet Maker turns the same photo into a printable practice sheet, and our Drawing Pets & Animals handbook (part of Pro) goes further into eyes, fur and the differences between breeds.