How to Transfer a Drawing to Canvas: 4 Methods Compared
Grid method, projector, transfer paper, or freehand sighting? Compare the four ways to get a reference onto canvas or paper, with setup steps, accuracy trade-offs, and how to keep transfer lines from showing through your paint.
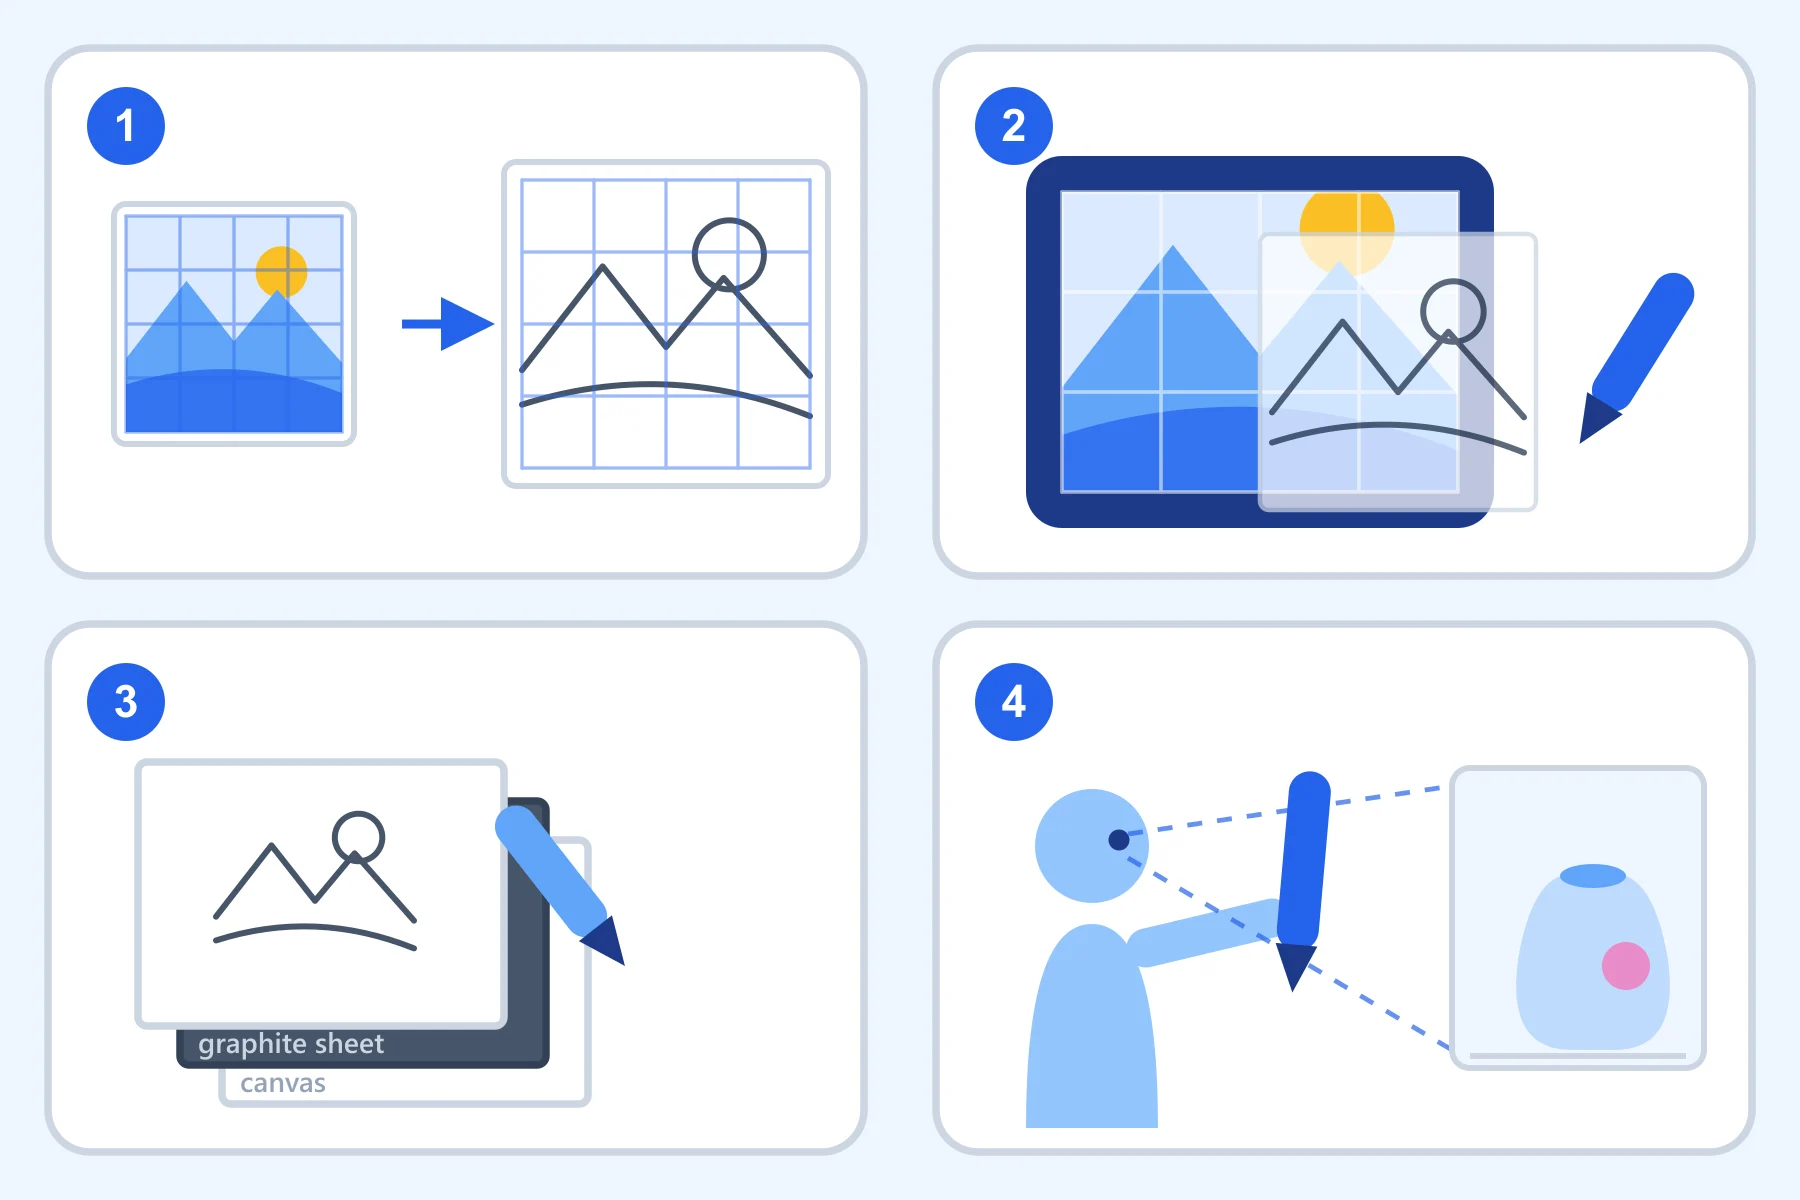
Every representational painting starts with the same unglamorous problem: getting the image out of the reference and onto the surface, at the right size, in the right place, without wrecking the surface in the process. There are four methods worth knowing - the grid, a projector or screen, transfer paper, and freehand sighting - and they are not interchangeable. This guide covers how each one works, what it actually costs you in time and accuracy, and which to reach for on a given project.
Why Transfer Is Its Own Step
Most drawing advice treats the first marks on a canvas as part of drawing. In practice they are a separate job with separate failure modes. A transfer can go wrong in ways that have nothing to do with your skill as a draughtsman: the composition ends up 10% too large and loses its margins, the head sits too high, the lines are too dark to paint over, or the reference and canvas were never the same shape to begin with.
Treating transfer as its own step gives you one useful habit - checking the result before you commit paint. Every method below produces an intermediate state (a gridded underdrawing, a traced outline, a pressed contour) that you can step back from, assess, and fix cheaply. Paint over it too early and every correction costs you a layer.
One thing to settle before you pick a method: your reference and your surface should share an aspect ratio, or you should have consciously decided how to crop. A 3:2 photo forced onto a square canvas has to lose a third of its width somewhere, and it is far better to choose where than to discover it halfway through. Our aspect ratio calculator and canvas size calculator settle that question in a few seconds.
Method 1: The Grid Method
The grid method divides the reference into equal squares, draws a matching grid on the surface, and has you copy the contents of one square at a time. It is the oldest of the four - Renaissance workshops used it, and it works for the same reason today: the eye compares small shapes accurately and large shapes badly. A grid resets every judgement to a size your eye can actually handle.
How to set it up
- Grid the reference. Upload your photo to the grid maker, pick a column and row count, and turn on cell labels so every square has a reference like B3. Download or print it.
- Match the ratio. Confirm your surface has the same proportions as the gridded reference, so the same number of columns and rows divides it evenly.
- Draw the surface grid lightly. Divide the surface into the same number of squares. On paper, a hard pencil (2H) and a light touch; on canvas, a light-value pastel pencil or a thinned wash line that your paint will bury.
- Work square by square, in reading order. For each cell, note only the two or three contours that pass through it and where they cross the edges. Resist finishing any single square.
What it costs and what it buys
Setup runs from about five minutes on a sketchbook page to an hour or two on a wall. In exchange you get the only method here that stays useful after the transfer: the grid remains on the surface as a measuring instrument, so you can verify proportions at any point until you paint over it. Density is the main dial - 6x6 to 8x8 for a landscape, 10x10 to 12x12 for a portrait, and our grid density guide covers the rest.
The grid also happens to be the only method that trains you. Every square is a small act of observation, and after a dozen drawings you will find yourself needing fewer lines. Nothing else on this list has that property.
Method 2: A Projector or Tablet Screen
Projection puts the reference directly onto the surface so you can trace it. Traditionally this meant an opaque projector or a slide projector in a darkened room. Today most artists use one of two cheaper versions: a small digital projector pointed at a wall or canvas, or a tablet acting as a lightbox with the paper laid over the glass. Our free Art Projector is built for the second case - it puts a reference fullscreen with an optional grid over it, plus flip, grayscale, invert and brightness controls, and keeps the screen awake while you work.
How to set it up
- Fix the geometry first. With a real projector, square the lens to the surface. Any tilt introduces keystone distortion, which stretches one side of your image and is very hard to spot until the drawing is finished.
- Mark the boundary. Before tracing anything, mark the four corners of the projected image on the surface. If the setup gets bumped - and it will - those marks let you realign in seconds instead of starting over.
- Trace contours only. Outline the major shapes and the boundaries between light and dark. Do not trace texture or detail; you are building a map, not a finished drawing.
- Check it with the projector off. Turn everything off and look at the drawing on its own. Traced lines that felt right under projection often reveal a distortion or a missing structural line in normal light.
What it costs and what it buys
Projection is the fastest method here and the most exact for complex subjects - lettering, machinery, architecture, anything where a small proportional error reads as a mistake rather than a style. The trade-offs are real, though. A tablet lightbox is limited to the size of the screen, so it will not help you past roughly A4. A projector needs controlled light. Neither gives you any way to check proportions once the setup is gone, and neither teaches you anything: the eye is not doing the measuring, so it does not improve.
You already own a projector
Any tablet or phone can act as one. The Art Projector displays your reference fullscreen with a grid on top, so you can trace from the glass - or use the grid to transfer by eye at a larger size. Free, and your image is processed on your device rather than uploaded.
Method 3: Transfer Paper and Graphite Backing
Transfer paper is a thin sheet coated on one side with graphite or a coloured pigment. Sandwich it between your drawing and your surface, trace over the drawing with a stylus, and the pressure deposits a line underneath. It is the standard way to move a finished, considered drawing onto a good surface without drawing on that surface at all - which matters when the surface is expensive watercolour paper that will not survive erasing.
How to set it up
- Size the drawing first. Transfer paper does not scale anything. Your drawing has to already be at final size, so enlarge it beforehand - a photocopier, a print at the right dimensions, or a grid scale-up if you are working from something smaller.
- Hinge, don't float. Tape the drawing along one edge only, so you can lift it like a page and check progress without losing registration.
- Use wax-free transfer paper. This matters more than anything else in this section. Wax-based papers (including old-fashioned carbon paper) leave a residue that repels paint and cannot be erased. Wax-free graphite paper lifts with a kneaded eraser and takes paint normally.
- Trace with an embossing stylus, not a pencil. A stylus or a spent ballpoint gives a consistent line and, unlike a pencil, shows you exactly which contours you have already done.
No transfer paper on hand? Make your own: rub a soft graphite stick (4B or softer) over the back of your drawing, covering the area behind the lines, then buff it with a tissue so it deposits evenly. Place it face up on the surface and trace. The result is identical to shop-bought paper and costs nothing.
What it costs and what it buys
Transfer paper preserves a drawing exactly, protects the final surface from erasing and reworking, and is repeatable - you can transfer the same drawing onto several surfaces, which is why printmakers and sign painters rely on it. What it cannot do is change size, and it needs a drawing to exist first. It is the last step of a process, not the whole process.
Method 4: Freehand Sighting
Sighting is transfer with no equipment at all: you hold a pencil at arm's length, use it to measure and compare, and place the drawing by eye. It sounds like the absence of a method, but it is a real technique with a real procedure - and it is what every other method on this list is quietly training you toward.
How to do it
- Pick a unit. Choose one measurement in the subject - the head height, the width of a vase, the length of a roofline - and treat it as your ruler. Everything else gets described in those units.
- Lock your position. Hold the pencil at full arm's length with the elbow straight, and keep the same eye closed each time. Any change in distance changes every measurement you take.
- Block in with the extremes. Mark the highest, lowest, leftmost and rightmost points of the subject first. Those four marks fix the scale and placement of everything that follows.
- Check angles and verticals. Hold the pencil against an edge in the subject to read its angle, and use a plumb line to see what sits directly above what. Most freehand errors are angles, not lengths.
What it costs and what it buys
Freehand sighting is the only method that works from life rather than a photograph, which makes it indispensable for portrait sittings, plein-air landscape, and anything moving. It is also the fastest once learned, and the only one that improves as you do. The cost is accuracy: expect to spend the first hour correcting rather than committing, and expect a likeness to be genuinely hard for the first few years. Our grid method vs freehand comparison goes deeper on the trade-off, and the portrait proportion guides give you reliable landmarks to check yourself against.
The Four Methods Side by Side
| Method | Setup | Can it rescale? | Trains your eye? | Best for |
|---|---|---|---|---|
| Grid method | 5 min to 2 hrs | Yes, any ratio | Yes - the most | Portraits, murals, learning |
| Projector / screen | 2 to 15 min | Yes, within range | No | Deadlines, lettering, complex detail |
| Transfer paper | 5 min | No | No | Finished drawings, delicate surfaces |
| Freehand sighting | None | Yes, by eye | Yes | Life drawing, plein air, speed |
The column that decides most projects is the third one. If the image has to change size, transfer paper is out immediately, and the choice narrows to a grid, a projector, or your own judgement.
Which Method to Use, by Project
A portrait from a photograph
Use the grid, at 10x10 or finer. Faces are the least forgiving subject there is - a few millimetres of error in eye spacing reads instantly as "not them" - and the grid is the only method that lets you keep checking as you go. See our portrait grid guide for the feature-by-feature approach.
A mural or anything larger than your arm span
Grid, without much debate. Projection onto a big wall needs darkness you rarely have on site, and freehand at that scale is a proportional coin flip because you cannot see the whole surface at once. The Mural Scaling Calculator turns your reference and wall dimensions into a scale factor and square size, and the mural guide walks the full process.
A commission due tomorrow
Projector. Speed is the requirement, the client is paying for the finished piece rather than your growth as an artist, and tracing a contour is a legitimate professional shortcut - illustrators and sign painters have done it for a century.
A finished pencil drawing you want to paint
Transfer paper, wax-free. It moves the drawing you already approved onto watercolour paper or canvas without a single eraser mark on the good surface.
Life drawing, or anything that moves
Sighting, because nothing else works. There is no reference to grid and nothing to project. This is also the case for sketchbook work, where the point is the practice rather than the result.
Combining methods
Most experienced artists mix them, and the combinations are worth knowing. Grid the reference but transfer by eye, using the squares only to spot-check placement. Project a rough contour and then verify the proportions with sighting before you commit. Or grid a small drawing up to full size, refine it on paper, and use transfer paper for the final move onto canvas - the enlargement and the preservation handled by the two methods that are actually good at each.
Transferring Without Ruining the Surface
Every method above puts marks on a surface you intend to cover. Getting that part wrong is the most common way a good transfer turns into a bad painting.
- Graphite bleeds through thin paint. Under opaque acrylic a pencil line disappears; under a watercolour wash, a glaze, or thin oil it ghosts through and can even lift into the paint and grey it. For anything transparent, transfer in a light-value coloured pencil or a thinned wash of a colour close to your final one.
- Press as lightly as the surface allows. On watercolour paper a hard line dents the fibres, and the dent shows in every wash you lay over it regardless of whether the graphite is still there.
- Erase before you paint, not after. Lift excess graphite with a kneaded eraser while the surface is still bare. Once paint is down, the lines under it are permanent.
- Fix the drawing on canvas. A light spray of workable fixative stops the underdrawing from lifting into your first layer and muddying it - especially with charcoal or soft pastel lines.
- Keep grid lines and contours distinguishable. Draw the grid in one colour and the drawing in another. Trying to work out which faint line is a mountain and which is a grid line, two hours in, is genuinely miserable.
One last habit worth building: photograph the transfer before you paint and look at it on your phone. Shrinking the image is the cheapest proportional check there is, and it catches errors that are invisible at working distance.
Frequently Asked Questions
Is tracing or using a projector cheating?
No. Transfer is a technical step, not the artistic one, and professionals have used mechanical aids for five centuries - Vermeer with optics, Ingres with tracings, Chuck Close with grids. What matters is what you do after the outline: the drawing, value, colour and edges are still entirely yours. The only real cost of tracing is that it does not improve your eye, which is an argument for using the grid while you are learning, not a moral one.
What is the most accurate way to transfer an image to canvas?
For pure fidelity to the reference, projection is the most exact, because it removes human judgement from the placement entirely. The grid method is a close second and is more reliable in practice, because it does not depend on a setup staying perfectly aligned and it lets you catch errors while the drawing is still correctable.
How do I transfer a drawing to canvas without transfer paper?
Rub soft graphite (4B or softer) over the back of your drawing, buff it evenly with a tissue, then place it face up on the canvas and trace the lines with a stylus. It behaves exactly like shop-bought wax-free transfer paper. If your drawing also needs to change size, use a grid instead - graphite backing transfers at 1:1 only.
Will the transfer lines show through my paint?
Under opaque acrylic or oil, almost never. Under watercolour, glazes, or any thin application, often. If your paint will be transparent, transfer with a light coloured pencil rather than graphite and keep the pressure light enough that you do not emboss the surface.
Can I use the grid method on canvas without drawing on the canvas?
Yes - two ways. Stretch light thread or thin tape across the stretcher bars to make a physical grid that sits above the surface, or grid a sheet of paper at canvas size, draw there, and transfer the finished result with graphite backing. Both keep the canvas clean.
What size grid should I use for a transfer?
Start at 8x8 for landscapes and general subjects, 10x10 to 12x12 for portraits and detailed work, and 4x4 to 6x6 for bold or simple compositions. More squares mean more accuracy and more setup time; the grid density guide has a full breakdown by subject.
Getting Started
Whichever method fits your project, the reference preparation is the same: get the image gridded, sized, and printed before you touch the surface. Upload a photo to the free grid maker to add a labelled grid, grab blank printable grid paper for the drawing side, or open the Art Projector if you would rather trace from the screen. For anything that needs to change size on the way, the proportion calculator works out the scale factor before you commit a single line.